How to Organize Your Microscope Slide Storage Effectively?
Microscope slide storage is crucial in laboratories. Proper organization minimizes the risk of damage and enhances workflow efficiency. According to a report by the National Science Foundation, improperly stored slides can lead to a loss of valuable data. Each year, labs waste significant resources due to misplaced or damaged specimens.
A well-structured storage system can prevent these issues. For example, using labeled boxes or trays can help researchers quickly access necessary slides. Many experts suggest that color-coding and clear documentation can further improve slide retrieval times. However, some labs underestimate the impact of poor organization. Failure to develop a practical storage system may lead to time-consuming searches and decreased productivity.
Additionally, it is vital to regularly review the state of your microscope slide storage. As slides age, the risk of deterioration increases. If monitoring is neglected, slides may become unusable. Reflecting on current practices is key to preventing such losses in valuable samples and time. Overall, effective organization is not just about efficiency; it also preserves scientific integrity.

Choosing the Right Storage Solutions for Microscope Slides
Choosing the right storage solutions for microscope slides is essential for maintaining organization and accessibility. One effective method is using slide boxes. These boxes come in various sizes and can hold multiple slides securely. Labeling each box is crucial. A well-marked box saves time when searching for specific samples.
Consider using vertical storage systems. They are efficient and can maximize space. Storing slides vertically can prevent them from sticking together. However, using this method requires careful handling to avoid damaging the slides. It’s also important to routinely check for wear. Over time, boxes may lose their ability to protect slides.
Another option is digital documentation. Photographing each slide can create a quick reference. This can reduce clutter while ensuring information is accessible. Yet, this method might lead to technical issues, like file loss. Balancing physical storage and digital copies is vital for effective organization.
Microscope Slide Storage Solutions Comparison
This chart compares different storage solutions for microscope slides. The data includes the number of slides each solution can hold and their average cost. It helps in making an informed decision on choosing the right storage option.
Organizing Slides by Type and Purpose for Easy Access
Organizing microscope slides by type and purpose is essential for efficient access and usage. According to a 2021 survey by the Scientific Instrument Manufacturers Association, 72% of professionals report that disorganized slide storage leads to wasted time. This highlights the necessity for a well-structured system.
When categorizing slides, consider key factors like specimen type and intended use. For instance, group plant samples separately from animal tissues. Utilize clear labels to denote each category, making it easier to find specific slides quickly. A study in the Journal of Microscopy found that researchers who implemented organized storage saw a 35% decrease in retrieval time.
Despite the benefits, achieving perfect organization is challenging. Some slides may not fit neatly into a category. This adds frustration for users. Regularly reassess your system to accommodate new slides and changing research needs. Striving for better organization can lead to improved workflow and more effective research outcomes.
Maintaining Proper Conditions for Slide Preservation
When it comes to preserving microscope slides, maintaining proper conditions is crucial. Humidity is a common enemy. High moisture levels can lead to mold growth, damaging your slides. Using silica gel packets can help absorb excess moisture. Choose a stable, cool environment for storage too. Fluctuating temperatures can affect the integrity of your samples.
Proper labeling is also essential. Each slide should have clear, legible information. Use waterproof markers to avoid fading. It’s frustrating to forget what’s on a slide. A dedicated catalog can ease this burden. It can also save time when searching for specific samples.
Reflect on your current storage practices. Are your slides organized? Is your storage location suitable? Over time, it’s easy to fall into a routine without checking conditions. Routinely assess your storage environment and adjust as necessary. Taking these steps can significantly prolong the life of your microscope slides.
How to Organize Your Microscope Slide Storage Effectively? - Maintaining Proper Conditions for Slide Preservation
| Category |
Recommended Storage Conditions |
Temperature (°C) |
Humidity (%) |
Notes |
| Biological Slides |
Cool, Dry Place |
18-25 |
30-50 |
Avoid direct sunlight |
| Prepared Microscope Slides |
Airtight Containers |
20-22 |
40-60 |
Use silica gel packets |
| Vintage Slides |
Climate-Controlled Storage |
15-22 |
20-40 |
Regularly check for mold |
| Stained Slides |
Dark Storage Area |
20-24 |
30-50 |
Protect from vibrations |
Regular Inventory and Maintenance of Microscope Slides
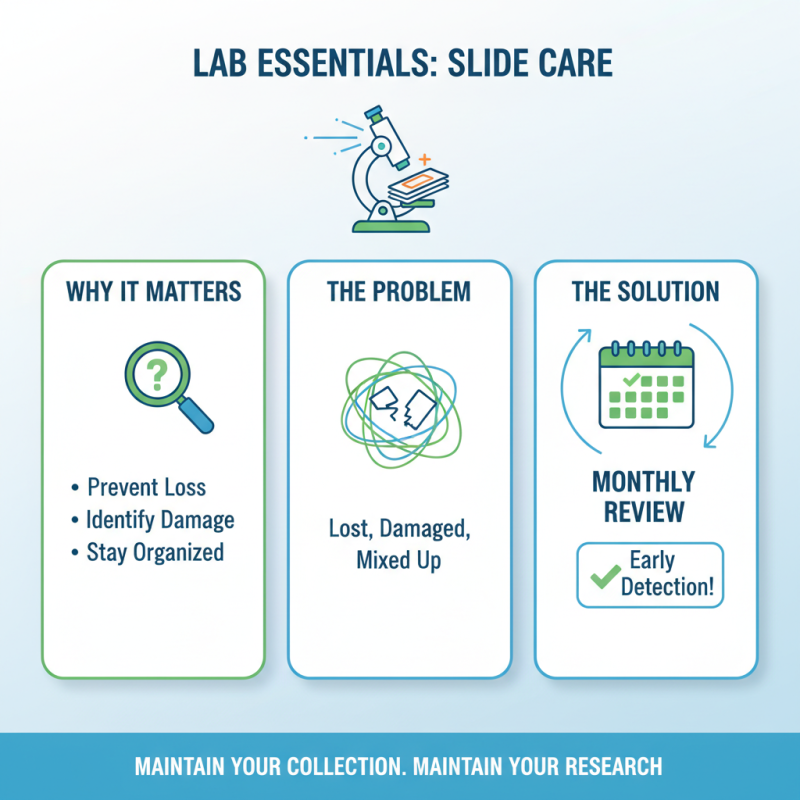
Regular inventory and maintenance of microscope slides is crucial for any lab. Over time, slides can get lost, damaged, or mixed up. Establishing a routine for checking your collection helps identify issues early. Aim to review slides monthly. This frequency allows you to spot missing or damaged items quickly.
When conducting inventory, create a simple log. Record slide names, dates of preparation, and any notes on condition. With this log, it becomes easier to keep track of your slides. Consider using color-coded labels. They can draw attention to slides that need further review or re-preparation. Sometimes, labels fade or peel away. It’s frustrating to rely on outdated information.
Maintenance extends beyond inventory. Regularly clean storage areas and the slides themselves. Dust can obscure important details. Unsealed slides can dry out or become contaminated. Take a moment to reflect: are you truly keeping your slides in optimal condition? Small lapses can lead to significant issues later. Keeping everything organized not only eases access but ensures quality in your work.